Dataverse Account Creation Automated Email: Difference between revisions
Dahaddican (Sọ̀rọ̀ | contribs) |
Dahaddican (Sọ̀rọ̀ | contribs) No edit summary |
||
| (8 intermediate revisions by the same user not shown) | |||
| Line 1: | Line 1: | ||
**[[Register for an ADA Dataverse DEPOSIT Account]] | **[[Register for an ADA Dataverse DEPOSIT Account]] | ||
***[[Dataverse Account Creation Information]] | ***[[Dataverse Account Creation Information]] | ||
***[[Dataverse Deposit Terms and Conditions of Use]] | |||
***[[Dataverse Account Creation Automated Email]] | ***[[Dataverse Account Creation Automated Email]] | ||
***[[Update Dataverse Account Email Address]] | ***[[Update Dataverse Account Email Address]] | ||
| Line 28: | Line 28: | ||
1. Navigate to the Dataverse DEPOSIT site and Log-In to your account. | 1. Navigate to the Dataverse DEPOSIT site and Log-In to your account. | ||
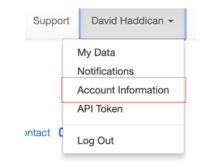
2. Select the "Account Information" option from the drop down menu shown beneath your name. | 2. Select the "Account Information" option from the drop down menu shown beneath your name. [[File:Account Information option.png|200px]] | ||
3. Next to your email address you will note that there is an option to verify your account. Select this link and a verification email will be sent to you. You can now verify your account by accessing the link sent to you. | 3. Next to your email address you will note that there is an option to verify your account. Select this link and a verification email will be sent to you. You can now verify your account by accessing the link sent to you. | ||
You can confirm that your account has been verified by navigating back to your 'Account Information'. | You can confirm that your account has been verified by navigating back to your 'Account Information'. | ||
Once the above steps have been completed, next to your email you should see a tick followed by the term "Verified" as in the illustration below. [[File:Account verification confirmation.png|400px]] | |||
Latest revision as of 22:03, 22 October 2019
To complete your Dataverse Account creation you need to verify your email address.
Account Verification Guidance Notes

Upon submission of your completed online Account Creation Form and the subsequent creation of your account, you will automatically be sent a verification link that needs to be accessed in order to confirm your email address (see diagram opposite).
Selecting this link completes the Account Creation process, unlocking your account. This will allow you to:
- be granted Curator permissions for population of the 'Shell Dataverse & Dataset' using the Self-Deposit process, on the DEPOSIT site if you have verified the email address associated with a Dataverse DEPOSIT account.
Email Verification Confirmation
Once your email address has been verified, your account will be unlocked and you will receive a Welcome message (via email and also through the Dataverse Notifications Tab when you first log in to your account - see diagrams below).
If I don't receive a Verification Email
If you do not receive a verification email from Dataverse you can manually verify your email address, allowing you to activate your account fully. As the automatic verification link is only valid for 24 hours from the time of the submission of the online Account Creation Form, the ability to manually verify your account will only be activated once this time period has elapsed. To manually verify your account you should:
1. Navigate to the Dataverse DEPOSIT site and Log-In to your account.
2. Select the "Account Information" option from the drop down menu shown beneath your name. 
3. Next to your email address you will note that there is an option to verify your account. Select this link and a verification email will be sent to you. You can now verify your account by accessing the link sent to you.
You can confirm that your account has been verified by navigating back to your 'Account Information'.
Once the above steps have been completed, next to your email you should see a tick followed by the term "Verified" as in the illustration below. 

