Instructions on how to Zip and Encrypt a file or folder: Difference between revisions
Dahaddican (talk | contribs) |
Dahaddican (talk | contribs) |
||
| Line 9: | Line 9: | ||
====Compressing a file==== | ====Compressing a file==== | ||
1. Compress each file that requires encryption by holding down the Ctl key and selecting the file. Then select the 'Compress' option. | 1. Compress each file that requires encryption by holding down the Ctl key and selecting the file. Then select the 'Compress' option. | ||
Revision as of 01:55, 19 September 2019
The guidance below will provide you with the details to zip and encrypt your files with a password prior to uploading them to the 'Shell Dataset'.
Mac OS Users
The 7-Zip Software is not available for Apple Mac OS users. You should therefore use the Apple Compression and Password Protection tools to effectively zip your files prior to upload. These files can then be accessed by other users with free software such as TheUnarchiver.
Compression and Password Protection Guidance Notes using Mac OS
For Mac OS users, it is recommended that the standard Apple software be used to compress and password encrypt your files. The following steps can be followed to do this.
Compressing a file
1. Compress each file that requires encryption by holding down the Ctl key and selecting the file. Then select the 'Compress' option.
This will create a .zip version of the file, with the same name and in the same location as the source file.
Encrypting a file
1. Create a 'New Folder' for each file that requires encryption, and place the compressed .zip file into the folder. Give the folder the same name as the .zip file it contains but do not include any file extension in the folder name.
This step is required as the Apple Mac OS Disk Utility App can only apply the password protected encryption to a folder.
2. Click Command + Shift + A to open the 'Applications' Folder or navigate to this folder through the 'Finder'.
3. Open the 'Utilities' Folder within the 'Applications' Folder.
4. Open the 'Disk Utility' Folder within the 'Utilities' Folder..
5. Click on the 'File' tab in the top ribbon.
6. In the menu list, select 'Image from Folder'.
7. In the window, select the folder that you wish to encrypt and click 'Open'.
8. Rename the locked disc image if required and select the encryption type.
Assuming the folder name was changed at Step 1. it will not need to be renamed here. Note that AES-256 encryption is preferred as this is the safest option, but it is slower.
9. Enter a password for the encryption and click 'Save'.
Remember to make a note of the password as you will need to communicate this to the ADA in order for them to conduct Quality Assurance checks on your deposit. Passwords should not be sent in emails.
10. Click 'Done' to complete the Compression and Encryption.
The Compression and Encryption will help to ensure that your data remains protected during the file upload process. It also ensures that the files formatting is retained and prevents Dataverse from adding functionality that the ADA do not utilise at the current time.
Non Mac OS Users
For non Mac OS users, it is recommended by the ADA that all data files and certain supporting documents be encrypted using the 7-Zip open source software. This software is used by the ADA Staff and is free. This ensures that the files and folders are protected from unauthorised disclosure during the Dataverse upload process. The software creates a container called ‘archive’ that holds the files requiring protection. That archive container can then be encrypted and password protected. Copies of the software can be obtained via the links at https://www.7-zip.org/.
Zipping and Encryption Guidance Notes using 7-Zip
1. Right click on the file to be encrypted and select “7-Zip” and then the “Add to archive…” option. 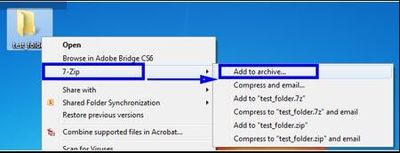

2. In the Add to Archive window, change the name of the archive that you wish to create if the name differs from the file name selected. 

3. Change the Archive format to “Zip”. 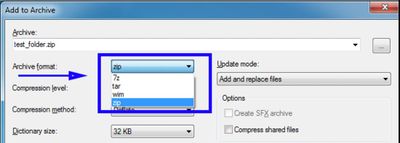


4. Change the Encryption Method to “AES-256”. There is a trade-off to be had between selecting AES-256 and ZipCrypto. AES-256 has been proven to be much more secure than ZipCrypto, but if you select AES-256 then the recipient of the zip file may also then have to install 7-Zip or another suitable program to read the file contents. The selection of ZipCrypto may allow users to open the zip file in Windows without a zip program, but it lacks in adequate protection when compared to AES-256. Since the ADA use 7-Zip, and the software is open source, it is the recommended encryption service for the Self-Deposit process.
5. At this point, you will be prompted to enter a Password. Use a strong password with at least 8 characters containing both upper and lower case letters, and a minimum of one number. Then select “OK” to create the encrypted archive file. This file will be located in the same folder or area as the original file. It is the addition of the password in this process that prevents Dataverse from undoing the zip, maintaining the original formatting and preventing the creation of the 'Explorer' function. If you do not enter a password, you will need to repeat the above process to double-zip the file (or folder).
Once the files and/or folders have been ingested to Dataverse, the ADA recommends that users do not upload or email passwords with the zip files and folders as these could be intercepted in transit. It is best to call the recipient and relay the password over the phone. The ADA is planning on implementing a facility that will allow you to communicate passwords via SMS messaging. Additional guidance on this can be obtained through the section Transmission of Passwords via SMS when it become available.
Where the Data Owner wishes not to use the 7-Zip product they should contact ADA Staff to discuss the implications of using an alternative software package prior to uploading their files and folders.