4. Population of 'Shell Dataverse & Dataset'

Pre-Uploading Activity
Post-Uploading Activity
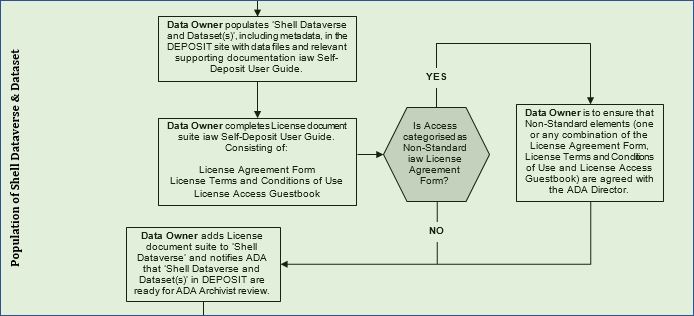
The information and links contained within this section will provide the Data Owner with the necessary information to populate their 'Shell Dataverse & dataset(s)' with the necessary data, supporting information and metadata. Allowing the deposit to be sent to the ADA for Quality Assurance checks and publishing.
Once your ‘Shell Dataverse and dataset(s)’ have been created, they need to be populated with the necessary information for the specific Research Project or Study. This will be covered in two distinct phases, identified as pre and post-upload activity.
Pre-Upload Activity
1. Prior to uploading to the 'Shell dataset', each individual file and/or folder will need to be checked for viruses and malware.
Once it has been confirmed that there are no viruses or malware attached to any of the files and/or folders:
2. You should then re-confirm that each individual file and/or folder has been Double-Zipped where required.
This will preserve their integrity during the Dataverse ingest process, as there are known issues with file and folder compatibility with Dataverse Version 4.6.1. Whilst this also disables Dataverse functionality that the ADA do not wish to utilise at this point in time. For additional information regarding this, plese refer back to the section titled Double-Zipping Files and Folders.
3. Having completed steps 1 and 2, the Files and Folders should be uploaded to their dataset(s).
Note: File upload limit size can vary and there can be differences in functionality based upon the Dataverse installation. This may include downloading data in different formats, file-level metadata preservation and file-level data citation depending upon the file type. Additional information can be found in the Dataverse User Guide. If you encounter issues when uploading your files and/or folders, contact a member of the ADA for advice.
Post-Upload Activity
4. Once the files and/or folders have been uploaded, they will require File Tags and Description Notes to be added.
The creation of up to three File tags and their Description Notes enables easier browsing through dataset files.
5. Finally, you should thoroughly review and edit the dataset(s) metadata fields.
Some of this information will have been entered by the ADA Staff in order to create the ‘Shell Dataset’ and it is important that this information is reviewed and updated where appropriate. However, most of the metadata will need to be entered at this stage. This is one of the most important aspects of the Self-Deposit process as it ensures that your data is accurately described by the person who knows the data best, YOU.
The metadata fields should be completed with all known and relevant information. The richness and accuracy of the metadata is a major bonus of the Self-Deposit process, assisting other users in locating and assessing the material easily and therefore supporting re-usability of the data. It is also worth noting that once published, your dataset metadata is going to be routinely harvested and advertised by the Research Data of Australia (RDA). Therefore, the richer the dataset metadata entered, the greater the exposure due to the harvesting, and the greater the chance that your work will be found, used, and recognised in the outputs of other researchers.
6. Access restrictions can be added to each file at this stage, if they are known. This will be covered in greater detail in the next section, noting that Access Restrictions are typically applied by ADA Staff once you have determined and submitted the Licensing conditions for the deposit.