Instructions on how to Double-Zip: Difference between revisions
Dahaddican (talk | contribs) |
Dahaddican (talk | contribs) |
||
| (12 intermediate revisions by the same user not shown) | |||
| Line 1: | Line 1: | ||
The guidance below will provide you with the details to Double-Zip your CSV, Stata, SPSS, SAS and Excel files prior to uploading them to the 'Shell Dataset'. | |||
'''NOTE: It is important to move all of the files that you need to Double-Zip to your desktop prior to completing the actions below. If you do not do this, the entire folder structure that your files are contained within will be replicated by the zip activity. This means that any user trying to access the file at a later date may need to open a number of folders just to access a single file. Moving the files to your desktop prior to Double-Zipping them means that only a single folder (i.e. the desktop) will need to be opened to reach the file.''' | |||
==Mac OS Users== | |||
Apple Mac OS users should use the Apple Terminal Tab to create their Double-Zipped .zip archive file in preparation for uploading to the dataset. The file can be accessed by non-Apple Mac OS users with free software such as [https://theunarchiver.com/ TheUnarchiver]. Apple do provide other tools for zipping such as Utility Disc or the inbuilt Compression tool, however these methods may prevent you from being able to Double-Zip the file. | |||
===Double-Zipping Guidance Notes using Mac OS=== | |||
To access the standard Apple Mac OS software and to create a Double-Zipped file, the following instructions can be used. | |||
1. Navigate to the 'Applications' folder or press Command + Shift + A to open the folder. Then select the 'Utilities' folder from within the 'Applications' folder. [[File:Applications folder with Utilities folder access.JPG|350px]] | |||
2. Then select 'Terminal' from within the 'Utilities' menu. [[File:Utilities folder with access to Terminal Tab.JPG|300px]] | |||
The 'Terminal' tab will open with some basic information already presented to you. This includes the last login and the user details for your computer. [[File:Terminal tab window for editing.JPG|400px]] | |||
3. You now need to enter the instructions for the Terminal to create a zip file. To do this you need to type the command: zip ~/Desktop/"Name_of_zip_file".zip | |||
NOTE | |||
*There are spaces in the command after the first word "zip" and after the final term ".zip". | |||
*The term "zip" is the command that tells the Terminal to create a zip file. | |||
*The term "Desktop" has been entered in the example as the location that the chosen zip file will be sent to once it has been zipped. You can identify another location if you would prefer. | |||
*The "Name_of_zip_file" term is the name of the zip product that you want to create at the chosen file location. For Self-Deposits, the file name should adhere to the ADA Standard Naming Conventions. Complete the file name with the term ".zip " remembering that there is a space after the last letter of the word "zip". | |||
4. Now drag and drop the file that you want to zip '''from your desktop''' into the Terminal window, the text will auto-populate for you. Press the "Return" key once you have done this. | |||
The Terminal Tab will now create the .zip file, depositing it into the location identified in your command. An example of a completed file command and the creation of the zip file, in this case on the desktop can be seen in the illustration below. [[File:Double-Zip command.png|600px]] | |||
You can now repeat the above steps 1 thru 4 but this time drag and drop the zipped file (in this example Zip1File.zip) into the Terminal window. This will create a Double-Zipped version of the file. | |||
The Double-Zipping ensures that the files formatting is retained and prevents Dataverse from adding the Two Ravens functionality that the ADA do not utilise at the current time. | |||
===Double-Zipping Guidance Notes using 7-Zip=== | |||
For non Mac OS users, it is recommended by the ADA that all CSV, Stata, SPSS, SAS and Excel file formats be double-zipped using the 7-Zip open source software. This software is also used by the ADA Staff and is free. This ensures that the files and folders remain unaltered during the Dataverse upload process and prevents Dataverse from adding functionality that the ADA do not utilise at the current time and are currently unable to support. Copies of the software can be obtained via the links at [https://www.7-zip.org/ https://www.7-zip.org/]. | For non Mac OS users, it is recommended by the ADA that all CSV, Stata, SPSS, SAS and Excel file formats be double-zipped using the 7-Zip open source software. This software is also used by the ADA Staff and is free. This ensures that the files and folders remain unaltered during the Dataverse upload process and prevents Dataverse from adding functionality that the ADA do not utilise at the current time and are currently unable to support. Copies of the software can be obtained via the links at [https://www.7-zip.org/ https://www.7-zip.org/]. | ||
1. Make sure that the file that you want to Double-Zip has been moved or copied to your desktop. | |||
2. Right click on the file to be Double-Zipped and select “7-Zip” and then the “Add to archive…” option. [[File:Selecting 7-Zip to encrypt and zip file or folder.JPG|400px]] | |||
3. In the Add to Archive window, change the name of the archive that you wish to create if the name differs from the file name selected. Remember that file names need to conform to [[File & Folder Naming Conventions|ADA standard naming conventions]].[[File:Double Zipping change name of archive.JPG|400px]] | |||
4. Change the Archive format to “Zip”. [[File:Double Zipping change the archive format to zip.JPG|400px]] | |||
[[File:Double Zipping change to AES256 encryption.JPG|400px|right]] | [[File:Double Zipping change to AES256 encryption.JPG|400px|right]] | ||
5. Files and folders do not require encryption therefore you do not need to select a preferred encryption method or enter a password. Simply select “OK” to create the archive file. This file will be located in the same folder or area as the original file. Information is protected during the upload process through HTTPS protocols. | |||
6. To Double-zip the file (or folder), repeat steps 1 thru 4 above but this time selecting the zipped file (or folder) that you have created above. If you fail to Double-Zip the files (or folders) the original formatting may be altered during the ingest process by Dataverse and the unwanted Two Ravens explorer function will be added. | |||
If you do not wish not to use the 7-Zip product you should [[Contact the ADA|contact ADA Staff]] to discuss the implications of using an alternative software package prior to uploading your files (and folders). | If you do not wish not to use the 7-Zip product you should [[Contact the ADA|contact ADA Staff]] to discuss the implications of using an alternative software package prior to uploading your files (and folders). | ||
Latest revision as of 23:54, 15 March 2020
The guidance below will provide you with the details to Double-Zip your CSV, Stata, SPSS, SAS and Excel files prior to uploading them to the 'Shell Dataset'.
NOTE: It is important to move all of the files that you need to Double-Zip to your desktop prior to completing the actions below. If you do not do this, the entire folder structure that your files are contained within will be replicated by the zip activity. This means that any user trying to access the file at a later date may need to open a number of folders just to access a single file. Moving the files to your desktop prior to Double-Zipping them means that only a single folder (i.e. the desktop) will need to be opened to reach the file.
Mac OS Users
Apple Mac OS users should use the Apple Terminal Tab to create their Double-Zipped .zip archive file in preparation for uploading to the dataset. The file can be accessed by non-Apple Mac OS users with free software such as TheUnarchiver. Apple do provide other tools for zipping such as Utility Disc or the inbuilt Compression tool, however these methods may prevent you from being able to Double-Zip the file.
Double-Zipping Guidance Notes using Mac OS
To access the standard Apple Mac OS software and to create a Double-Zipped file, the following instructions can be used.
1. Navigate to the 'Applications' folder or press Command + Shift + A to open the folder. Then select the 'Utilities' folder from within the 'Applications' folder. 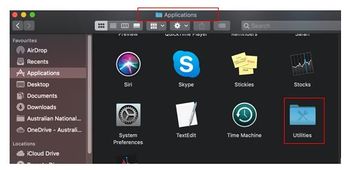
2. Then select 'Terminal' from within the 'Utilities' menu. 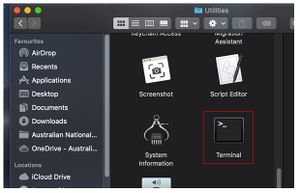
The 'Terminal' tab will open with some basic information already presented to you. This includes the last login and the user details for your computer. 
3. You now need to enter the instructions for the Terminal to create a zip file. To do this you need to type the command: zip ~/Desktop/"Name_of_zip_file".zip
NOTE
- There are spaces in the command after the first word "zip" and after the final term ".zip".
- The term "zip" is the command that tells the Terminal to create a zip file.
- The term "Desktop" has been entered in the example as the location that the chosen zip file will be sent to once it has been zipped. You can identify another location if you would prefer.
- The "Name_of_zip_file" term is the name of the zip product that you want to create at the chosen file location. For Self-Deposits, the file name should adhere to the ADA Standard Naming Conventions. Complete the file name with the term ".zip " remembering that there is a space after the last letter of the word "zip".
4. Now drag and drop the file that you want to zip from your desktop into the Terminal window, the text will auto-populate for you. Press the "Return" key once you have done this.
The Terminal Tab will now create the .zip file, depositing it into the location identified in your command. An example of a completed file command and the creation of the zip file, in this case on the desktop can be seen in the illustration below. 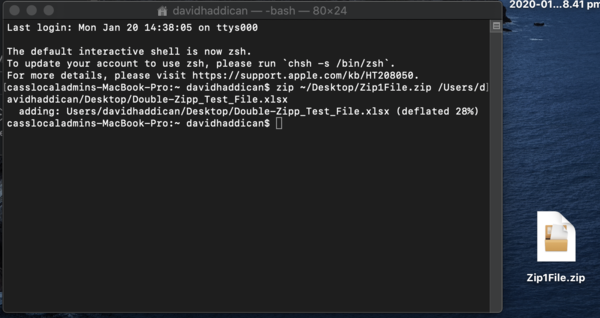
You can now repeat the above steps 1 thru 4 but this time drag and drop the zipped file (in this example Zip1File.zip) into the Terminal window. This will create a Double-Zipped version of the file.
The Double-Zipping ensures that the files formatting is retained and prevents Dataverse from adding the Two Ravens functionality that the ADA do not utilise at the current time.
Double-Zipping Guidance Notes using 7-Zip
For non Mac OS users, it is recommended by the ADA that all CSV, Stata, SPSS, SAS and Excel file formats be double-zipped using the 7-Zip open source software. This software is also used by the ADA Staff and is free. This ensures that the files and folders remain unaltered during the Dataverse upload process and prevents Dataverse from adding functionality that the ADA do not utilise at the current time and are currently unable to support. Copies of the software can be obtained via the links at https://www.7-zip.org/.
1. Make sure that the file that you want to Double-Zip has been moved or copied to your desktop.
2. Right click on the file to be Double-Zipped and select “7-Zip” and then the “Add to archive…” option. 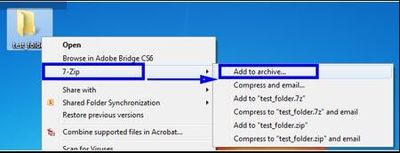
3. In the Add to Archive window, change the name of the archive that you wish to create if the name differs from the file name selected. Remember that file names need to conform to ADA standard naming conventions.
4. Change the Archive format to “Zip”. 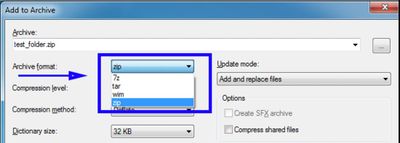
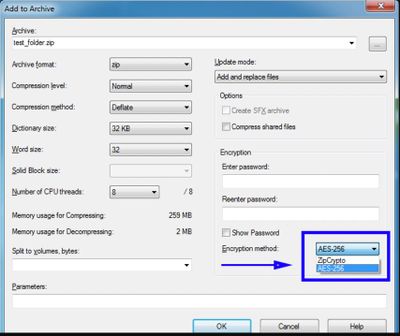
5. Files and folders do not require encryption therefore you do not need to select a preferred encryption method or enter a password. Simply select “OK” to create the archive file. This file will be located in the same folder or area as the original file. Information is protected during the upload process through HTTPS protocols.
6. To Double-zip the file (or folder), repeat steps 1 thru 4 above but this time selecting the zipped file (or folder) that you have created above. If you fail to Double-Zip the files (or folders) the original formatting may be altered during the ingest process by Dataverse and the unwanted Two Ravens explorer function will be added.
If you do not wish not to use the 7-Zip product you should contact ADA Staff to discuss the implications of using an alternative software package prior to uploading your files (and folders).